

🚀 Start now:  — first launch takes a couple of minutes to build.
⏱ Estimated time: ~60–90 minutes (including pipeline run time) • 🟡 Practical
In this practical you’ll run a real, published-standard nf-core RNA-Seq pipeline (nf-core/rnaseq) on example data — from raw sequencing reads all the way to a gene-count table and a quality report.
nf-core is a community that builds gold-standard, reproducible data pipelines that have become the industry standard.
nf-core have a variety of pipelines that tackle key bioinformatic challenges. Join them on Slack here.
What you’ll do
- Inspect the raw RNA-Seq data
- Work out what inputs the pipeline needs
- Build a samplesheet describing your samples
- Download a reference genome and annotation
- Run the pipeline with Docker containers
- Monitor and debug a run using the
work/directory and.command.*files - Explore the results (quality reports and gene counts)
- Learn to
-resumea run and change pipeline options
✅ Before you start, make sure you’ve completed Setup and that your terminal is inside the
eco-flow-trainingfolder. Check with:pwd # should end in eco-flow-trainingEverything below assumes you run commands from there. In Codespaces the full path is
/workspaces/training/eco-flow-training; on a local machine substitute your own path (usepwdto see it).
The experiment
We’ll compare gene expression between wild-type yeast cells and cells with a Rap1 gene knock-down (KD). There are 3 replicates of each condition. The data come from this paper: https://pubmed.ncbi.nlm.nih.gov/30576656/
| Sample | Condition | Reads |
|---|---|---|
| SRR6357070 | wild-type | paired-end (_1 + _2) |
| SRR6357071 | wild-type | paired-end (_1 + _2) |
| SRR6357072 | wild-type | paired-end (_1 + _2) |
| SRR6357073 | manipulated (KD) | single-end (_1 only) |
| SRR6357074 | manipulated (KD) | single-end (_1 only) |
| SRR6357075 | manipulated (KD) | single-end (_1 only) |
Step 0 — Understand RNA-Seq
Before running an RNA-Seq analysis, it helps to understand what it is. In short: RNA-Seq measures how much each gene is being expressed by sequencing the RNA in a sample, mapping those reads back to a reference genome, and counting how many land on each gene. This is covered in the lecture; the resources below go deeper.
📚 Great RNA-Seq learning resources
Step 1 — Inspect the raw data
It’s always worth looking at your data by eye before running anything. The reads live in the data folder.
The FASTQ files are compressed with gzip (they end in .gz), so they aren’t directly human-readable — plain cat/head would print gibberish (don’t panic if you see <��xT�r-�B7�..., that’s expected!). Instead, use zcat (from Part 1), which reads gzipped files.
🍎 On a Mac? In Codespaces (Linux)
zcatreads.gzfiles directly. macOS’szcatis different — it expects a.Zfile and will error on.gz. If you’re following along locally on a Mac, usegzcat(orgunzip -c) everywhere this page sayszcat.
▶️ Challenge — inspect a FASTQ file
Try to answer these two questions from the data:
- How many lines are in the FASTQ file?
- What is the length of the reads?
Use these commands:
zcat data/SRR6357070_1.fastq.gz | wc -l
zcat data/SRR6357070_1.fastq.gz | head -n 2 | tail -n 1 | tr -d '\n' | wc -c
✅ Answer
200000
101
The first command shows there are 200000 lines in the file. A FASTQ record uses 4 lines per read, so that corresponds to 50000 reads. The second command uses head and tail to grab the second line of the file, which is the first read sequence, and wc -c counts the number of characters in it. We add tr -d '\n' to strip the trailing newline first — without it, wc -c would also count the line break and report 102. So the reads are 101 bases long. There are many ways to do this, and even copying the file into an editor and looking at it manually is fine.
Structure of a typical FASTQ file
Each read in a FASTQ file is stored as four lines:
- Header line — starts with
@and contains the read identifier. - Sequence line — the DNA or RNA bases for that read.
- Separator line — a single
+, often followed by the same read identifier. - Quality line — one character of quality score per base, usually in ASCII.
For example:
@SRR6357070.1 1/1
GATCGGAAGAGCACACGTCTGAACTCCAGTCAC...
+
AAAAEEEEEEEEEEEEEEEEEEEEEEEEEEEE...
This layout is important because it lets the pipeline keep the sequence and its quality information together for every read.
Step 2 — Explore the pipeline’s requirements
Go to the nf-core/rnaseq page and read what the pipeline does and what inputs it expects: 👉 https://nf-co.re/rnaseq/3.26.0
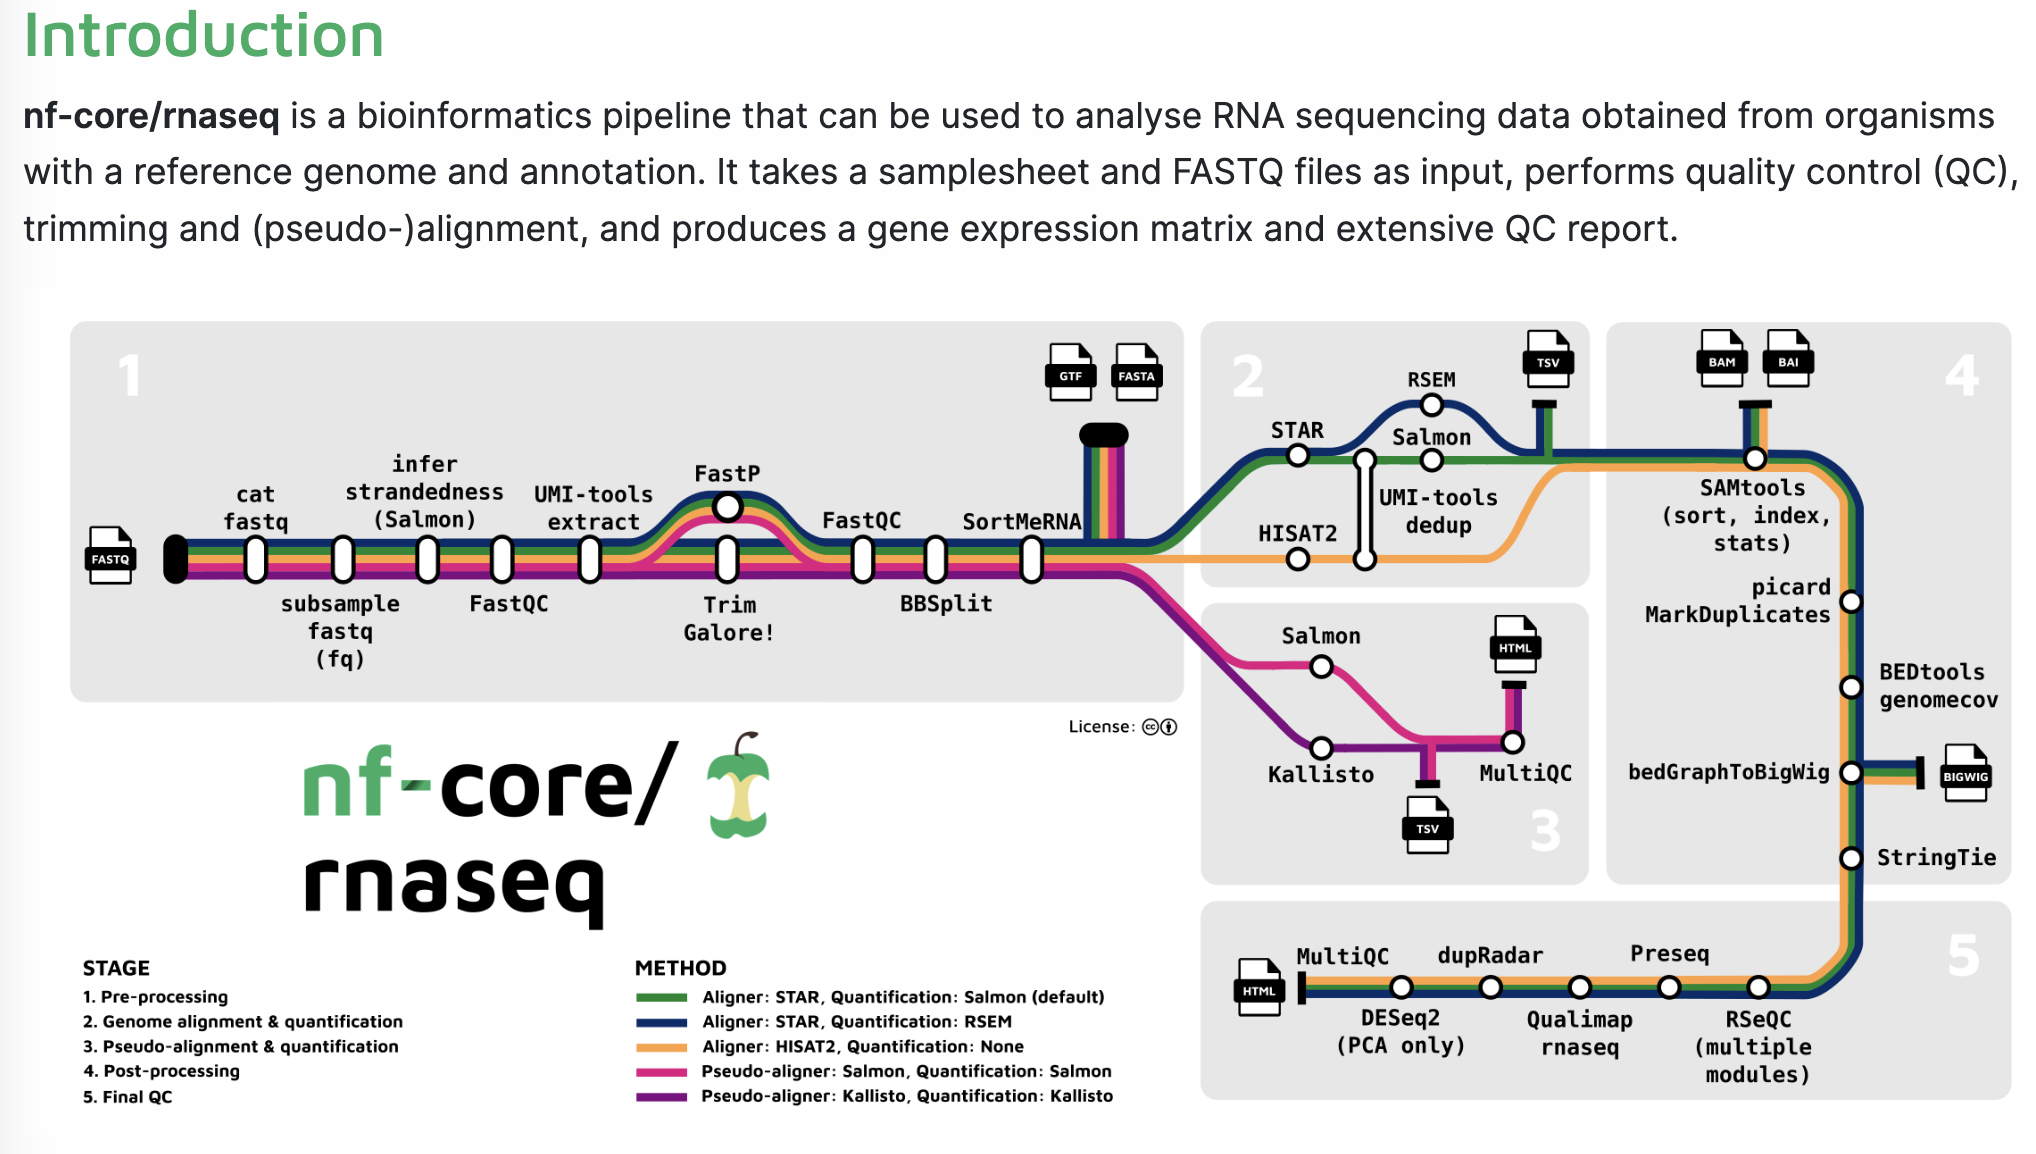
Cheat sheet — what the pipeline needs
To run nf-core/rnaseq you need three things:
- a genome (in FASTA format)
- an annotation (in GTF or GFF format) — tells the pipeline where the genes are
- an input samplesheet (CSV) that links to your raw RNA-Seq FASTQ data
💡 What the pipeline will do for you (automatically, in containers): quality-check the reads (FastQC), trim adapters (Trim Galore), align to the genome (STAR), quantify gene expression (Salmon), and summarise everything into one report (MultiQC). That’s a lot of tools you don’t have to install yourself!
Step 3 — Build the samplesheet
The samplesheet is a CSV file that tells the pipeline which files belong to which sample. Create a file called samplesheet.csv in the eco-flow-training folder (e.g. with nano samplesheet.csv).
It has four columns:
| Column | Meaning |
|---|---|
sample |
A name you choose for the sample (must match across replicates you want grouped) |
fastq_1 |
Full path to the forward reads (R1) |
fastq_2 |
Full path to the reverse reads (R2) — leave empty for single-end samples |
strandedness |
Library strandedness — use auto to let the pipeline detect it |
⚠️ Paired vs single-end: samples SRR6357070–072 are paired-end (fill both
fastq_1andfastq_2); SRR6357073–075 are single-end (fillfastq_1, leavefastq_2blank — note the trailing comma).
💡 For larger projects: if you had hundreds of samples, creating a samplesheet by hand would be tedious. nf-core/rnaseq includes a helper script, fastq_dir_to_samplesheet.py, that can scan a folder of FASTQ files and generate a samplesheet automatically. In this example, you would point it at the folder containing the FASTQ files (for example the
datadirectory), and it would infer sample names and pair files such as_1and_2together. You would still want to inspect the generated CSV to make sure the sample names and single-end/paired-end rows look correct before using it.If you wanted to try it yourself, you could download the script and run it like this:
curl -L https://raw.githubusercontent.com/nf-core/rnaseq/master/bin/fastq_dir_to_samplesheet.py -o fastq_dir_to_samplesheet.py
python3 fastq_dir_to_samplesheet.py \
  /workspaces/training/eco-flow-training/data \
  /workspaces/training/eco-flow-training/samplesheet.csv \
  -r1 _1.fastq.gz \
  -r2 _2.fastq.gz
This scans the
datadirectory, infers sample names from the FASTQ filenames, and writes a CSV that you can inspect and adjust before using it. Because this example dataset mixes paired-end and single-end reads, it is worth checking the generated file carefully and renaming samples if you want to match theCONTROL_REP*/MANIPULATED_REP*names used later in the course.
Try to build the samplesheet yourself using the example on the nf-core page as a guide to build the 3 wild type and 3 knock down samples, then compare with the cheat sheet.
Cheat sheet — full samplesheet.csv
sample,fastq_1,fastq_2,strandedness
CONTROL_REP1,/workspaces/training/eco-flow-training/data/SRR6357070_1.fastq.gz,/workspaces/training/eco-flow-training/data/SRR6357070_2.fastq.gz,auto
CONTROL_REP2,/workspaces/training/eco-flow-training/data/SRR6357071_1.fastq.gz,/workspaces/training/eco-flow-training/data/SRR6357071_2.fastq.gz,auto
CONTROL_REP3,/workspaces/training/eco-flow-training/data/SRR6357072_1.fastq.gz,/workspaces/training/eco-flow-training/data/SRR6357072_2.fastq.gz,auto
MANIPULATED_REP1,/workspaces/training/eco-flow-training/data/SRR6357073_1.fastq.gz,,auto
MANIPULATED_REP2,/workspaces/training/eco-flow-training/data/SRR6357074_1.fastq.gz,,auto
MANIPULATED_REP3,/workspaces/training/eco-flow-training/data/SRR6357075_1.fastq.gz,,auto
The CONTROL_* samples are the wild-type (paired-end) and MANIPULATED_* are the Rap1 knock-downs (single-end). Keep these sample names — Part 4 (differential expression) reuses them.
💡 Paths must be absolute. The paths above are the Codespaces location. On a local machine, replace
/workspaces/training/eco-flow-trainingwith the output of your ownpwd.
Step 4 — Download the genome and annotation
The pipeline needs a reference genome (FASTA) and annotation (GFF). Download both into the eco-flow-training folder (the same place as your samplesheet) using wget (from Part 1):
wget -O genome.fasta https://raw.githubusercontent.com/nf-core/test-datasets/7f1614baeb0ddf66e60be78c3d9fa55440465ac8/reference/genome.fasta
wget -O genes.gff.gz https://raw.githubusercontent.com/nf-core/test-datasets/7f1614baeb0ddf66e60be78c3d9fa55440465ac8/reference/genes.gff.gz
▶️ Check the downloads
ls -lh genome.fasta genes.gff.gz
✅ Expected output
Both files should be listed with a non-zero size:
-rw-r--r-- 1 user user  ...  genome.fasta
-rw-r--r-- 1 user user  ...  genes.gff.gz
If a file is 0 bytes or missing, the download failed — check your internet connection and re-run the wget.
💡 The
-Oflag names the downloaded file. The genome is the yeast reference sequence; the GFF lists where each gene sits on that sequence.
Step 5 — Run the pipeline
Now run nf-core/rnaseq, pointing it at your genome (--fasta), annotation (--gff), samplesheet (--input) and an output directory name (--outdir, choose anything).
Read the official run instructions here: https://nf-co.re/rnaseq/3.26.0/docs/usage
Two extra flags you must include in this environment:
-profile docker— runs every step inside its Docker container, so you don’t have to install any of the underlying tools. (On an HPC you’d use-profile singularityorapptainerinstead — ask your HPC team.)-c .../codespaces.config— a small custom config that adapts the pipeline to the tiny Codespaces machine. Without it the run is likely to fail. See below for exactly what it does.
We also pin the pipeline version with -r 3.26.0 so you get exactly the version this course was written for.
💡 Why pin the version? Without
-r, Nextflow runs the latest revision of the pipeline. Pipeline parameters change between releases (options get renamed or removed), so an un-pinned command can silently break over time. Pinning to3.26.0guarantees this exact command keeps working — pinning is the safe choice, not a risky one.⚠️ Pin to a release your Nextflow can actually run. Nextflow itself evolves too. For nf-core/rnaseq, releases before
3.17use an older config style that recent Nextflow versions refuse to read, stopping immediately withConfig parsing failed. If you ever see that, move the-rup to a newer release of the pipeline.
What is the codespaces.config and why do we need it?
nf-core pipelines ship with sensible default resource requests — but those defaults assume a beefy server. A GitHub Codespace is a small machine (about 2 CPUs and 8 GB RAM), so several steps would ask for more memory or CPUs than exist and the run would crash. The config file solves this. Open it (cat codespaces.config) and you’ll see:
process {
    resourceLimits {
        memory = '6.GB'   // never request more than 6 GB for any step
        cpus   = 2        // never request more than 2 CPUs
        time   = '1.h'    // cap each step at 1 hour
    }
}

params {
    skip_markduplicates = true   // skip a memory-heavy step we don't need here
}
resourceLimitsis a Nextflow feature that caps each step’s request. If the pipeline asks a step for 12 GB, Nextflow quietly clamps it down to our 6 GB limit so it still fits on the machine.skip_markduplicates = trueturns off the duplicate-marking step. It’s memory-hungry and not needed for this teaching example, so skipping it keeps the run fast and stable on the small machine.
📝 On your own laptop or an HPC you generally wouldn’t need this file — you’d let the pipeline use its defaults, or write a config tuned to your machine. It exists purely to make the pipeline fit inside Codespaces.
Cheat sheet — the full command
nextflow run nf-core/rnaseq \
-r 3.26.0 \
-profile docker \
-c /workspaces/training/eco-flow-training/codespaces.config \
--input /workspaces/training/eco-flow-training/samplesheet.csv \
--gff /workspaces/training/eco-flow-training/genes.gff.gz \
--fasta /workspaces/training/eco-flow-training/genome.fasta \
--outdir my_results
The \ at the end of each line just lets one command span several lines for readability.
👉 Single vs double dashes matter! A single dash (
-profile,-r,-c,-resume) is a Nextflow core option. A double dash (--input,--fasta,--outdir) is a pipeline parameter defined inside nf-core/rnaseq.
✅ What success looks like: Nextflow prints a banner and then a live list of processes as they run — something like:
 N E X T F L O W   ~  version 26.x.x
 Launching `https://github.com/nf-core/rnaseq` [gigantic_newton] ...
 executor >  local
 [a1/b2c3d4] NFCORE_RNASEQ:...:FASTQC (CONTROL_REP1)   [100%] 6 of 6 ✔
 [e5/f6a7b8] NFCORE_RNASEQ:...:STAR_ALIGN (...)         [ 50%] 3 of 6
 ...
This run takes roughly 10–20 minutes on the small test data — leave it running. The first time, Nextflow also downloads the containers, which adds a few minutes.
Troubleshooting Step 5
If the run stops with an error, it’s almost always one of these:
❌ Missing required parameter: --input / --outdir
You didn’t supply one of the required parameters. Check every --input, --fasta, --gff and --outdir is present and spelled correctly.
❌ Not a valid path value: 'genes.gff.gz'
A path is wrong or not absolute. Provide the full path, e.g. /workspaces/training/eco-flow-training/genes.gff.gz, and confirm the file exists with ls -l.
❌ .command.sh: line 7: fastqc: command not found (exit status 127)
You forgot -profile docker. Without it, Nextflow looks for the tools installed locally — but they aren’t. Adding -profile docker makes each step run inside a container that already has the tool.
If you get a different error, grab a tutor.
Step 6 — Monitoring a run: the work/ directory and .command.* files
While the pipeline runs (or after it fails), it helps to know where Nextflow actually does the work — this is the single most useful debugging skill in Nextflow, and it works the same for every pipeline you’ll ever run.
The work/ directory
Nextflow doesn’t run tools in your current folder. It creates a fresh, isolated directory for every single task under work/, stages that task’s input files into it, and runs the command there. Only the files a pipeline chooses to publish get copied out to your --outdir.
That’s what the hash at the start of each line in the console output is:
[a1/b2c3d4] NFCORE_RNASEQ:...:FASTQC (CONTROL_REP1) [100%] 1 of 1 ✔
a1/b2c3d4 is the task directory — work/a1/b2c3d4.../. (Nextflow shortens it on screen; the real directory name is longer.)
▶️ Look inside a task directory
ls work
ls -a work/a1/b2c3d4*/     # use a hash from *your* own output
✅ Roughly what you'll see
.command.begin  .command.err  .command.log  .command.out
.command.run    .command.sh   .exitcode
CONTROL_REP1_1.fastq.gz -> /workspaces/training/.../SRR6357070_1.fastq.gz
CONTROL_REP1_fastqc.html
The input files are symlinks back to their original location (that’s why the work dir doesn’t duplicate your data), and the outputs sit alongside them.
Note the leading . — these are hidden files, so plain ls won’t show them. Use ls -a.
The .command.* files
| File | What it holds |
|---|---|
.command.sh |
The exact script that was run for this task, with all parameters filled in. Read this first. |
.command.out |
Whatever the tool printed to standard output. |
.command.err |
Whatever the tool printed to standard error — error messages usually live here. |
.command.log |
Both of the above combined. |
.command.run |
The wrapper Nextflow built around your script (container/module setup, scheduler directives). Rarely needed, but this is where you check what Docker or Slurm was actually asked to do. |
.exitcode |
The exit status. 0 = success; anything else = failure. |
▶️ Try it — see exactly what a step ran
cat work/a1/b2c3d4*/.command.shYou can even re-run that script by hand inside the directory, which is the fastest way to test a fix.
When a task fails
Nextflow prints a block like this and stops:
ERROR ~ Error executing process > 'NFCORE_RNASEQ:...:STAR_ALIGN (CONTROL_REP1)'

Caused by:
  Process ... terminated with an error exit status (137)

Command executed: [ ... ]
Command exit status: 137
Work dir:
  /workspaces/training/work/e5/f6a7b89c0d1e2f...
The recipe is always the same:
- Copy the
Work dir:path. cdinto it.cat .command.err(and.command.log) to see the real error message.cat .command.shto see what was run, and check the input symlinks withls -a.
💡 Common exit codes:
127= command not found (usually a missing-profile docker),137= killed for using too much memory (raise the memory or lowerresourceLimits),1= the tool itself reported an error — read.command.err.
Watching progress and cleaning up
.nextflow.log— the driver’s own log, in the directory you launched from. If you ran with-bg(no output on screen), follow it withtail -f .nextflow.log.nextflow log— lists your previous runs and their run names.-
work/grows fast. It holds every intermediate file of every task, and can easily be many times the size of your results. Delete it only once you’re happy with your results, and remember that deleting it also destroys the cache that-resume(Step 8) depends on:du -sh work # how big has it got? nextflow clean -f # remove work data from previous runs rm -rf work # or just delete the lot
Step 7 — Explore the results
Once the pipeline finishes (Pipeline completed successfully), look inside your --outdir folder (my_results).
▶️ See what was produced
ls my_results
✅ Roughly what you'll see
fastqc multiqc pipeline_info star_salmon trimgalore ...
Each folder holds the output of one stage of the pipeline.
The full catalogue of outputs is documented here: https://nf-co.re/rnaseq/3.26.0/docs/output — spend ~10 minutes skimming it while the run finishes.
The two things to look at first:
-
The MultiQC report —
my_results/multiqc/star_salmon/multiqc_report.html. This single HTML page summarises quality and alignment across all samples. To view it in Codespaces, right-click the file in the Explorer and choose “Open with Live Server” (the extension is pre-installed), or download it (right-click → Download) and open it in your browser. -
The FastQC results — under
my_results/fastqc/. Check whether the raw reads were good quality. This guide explains how to read the FastQC plots and quality scores: https://bioinfo.cd-genomics.com/quality-control-how-do-you-read-your-fastqc-results.html
🧬 The key file for Part 4: the gene-count table lives at
my_results/star_salmon/salmon.merged.gene_counts.tsv. You’ll load this into R in the next section to find differentially expressed genes.
We’ll discuss the reports together in class.
Step 8 — Resuming a run and changing options
Real analyses are rarely run just once — you tweak options and re-run. Two things make that painless.
Changing an option
The pipeline has many options. For example, you can switch the alignment/quantification tools to STAR + RSEM with --aligner star_rsem (see the alignment options docs). Work out how you’d modify your command — but don’t run it yet:
Answer — the modified command
nextflow run nf-core/rnaseq \
-r 3.26.0 \
-profile docker \
-c /workspaces/training/eco-flow-training/codespaces.config \
--input /workspaces/training/eco-flow-training/samplesheet.csv \
--gff /workspaces/training/eco-flow-training/genes.gff.gz \
--fasta /workspaces/training/eco-flow-training/genome.fasta \
--outdir my_results \
--aligner star_rsem
(Note the \ after --outdir my_results — every line except the last needs one, or the --aligner option would be dropped.)
The -resume flag
Add -resume and Nextflow will reuse the cached results of any steps that haven’t changed, instead of recomputing them from scratch. If you re-run the command above with -resume, only the steps affected by the new --aligner option need to re-run — everything before that is pulled from the cache.
✅ What you’ll see with
-resume: unchanged processes are marked as cached, e.g.[a1/b2c3d4] NFCORE_RNASEQ:...:FASTQC (CONTROL_REP1) [100%] 6 of 6, cached: 6 ✔The word
cachedtells you Nextflow skipped the real work and reused the previous result — a huge time-saver during development.
Finish
🎉 You’ve finished the course! You’ve run a complete, reproducible RNA-Seq pipeline — from raw reads to gene counts and quality reports — using industry-standard nf-core tooling.
Next steps:
- Continue to Part 4 · Differential expression ▶️ to analyse the gene counts you just produced.
- Running on a cluster? See Part 8 · Running a pipeline on an HPC.
- Learn to write your own Nextflow: the excellent Seqera training.
- Eco-Flow will be providing more foundational Nextflow courses soon — email us to join the mailing list: ecoflow . ucl @ gmail . com