

🚀 Start now:  — first launch takes a couple of minutes to build.
⏱ Estimated time: ~60–90 minutes (including pipeline run time) • 🟡 Practical
In this practical you’ll run the nf-core ampliseq pipeline (nf-core/ampliseq) on example data — from raw sequencing reads all the way to a taxonomy classification, downstream analysis, and a quality report.
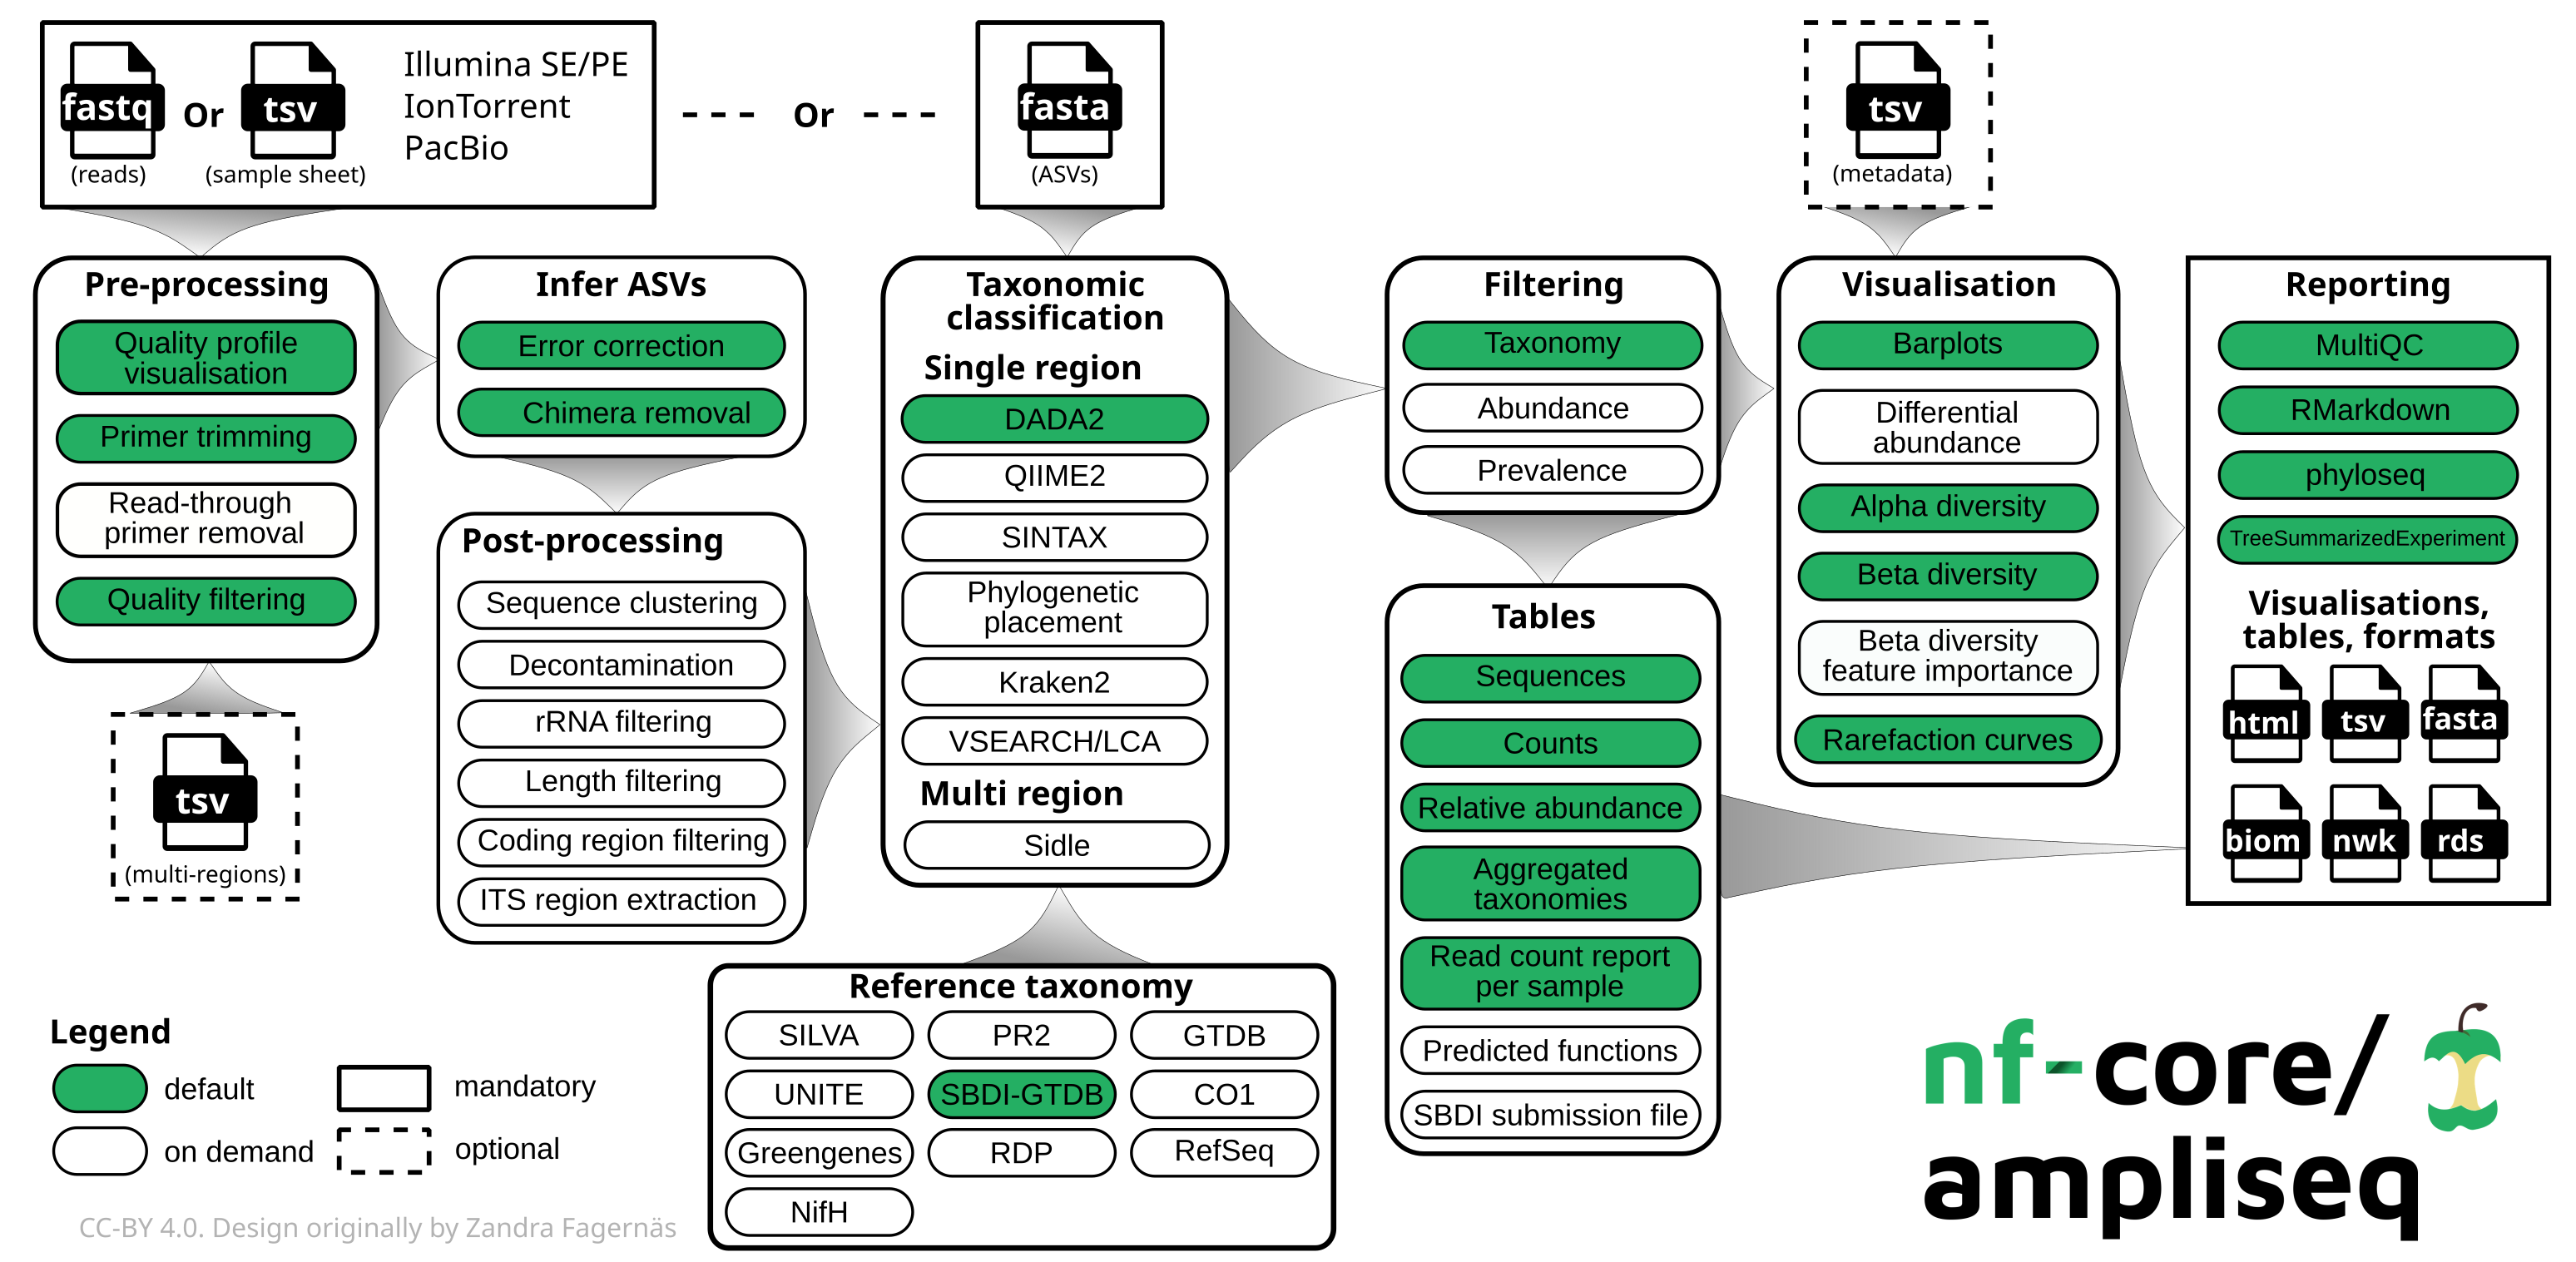
nf-core/ampliseq is a bioinformatics pipeline used for amplicon sequencing, supporting:
- QC and primer trimming.
- Amplicon denoising (error-correction). Via DADA2 or QIIME2.
- Taxonomic classification. Using a reference database (e.g. SILVA, UNITE, GTDB), via DADA2 or QIIME2.
- Downstream analysis. Diversity stats, plots, abundance tables.
- Reporting. MultiQC summary plus QIIME2 visualizations (
.qzvfiles).
What you’ll do
- Inspect the raw amplicon sequencing data
- Work out the inputs of the pipeline
- Build a samplesheet describing your samples
- Build a sample metadata for downstream analysis
- Run the pipeline with Docker containers
- Explore the results (quality reports and abundance tables)
- Learn to
-resumea run and change pipeline options
✅ Before you start, make sure you’ve completed Setup and that your terminal is inside the
eco-flow-training/ampliseqfolder. To go that folder do:cd eco-flow-training/ampliseqEverything below assumes you run commands from there. In Codespaces the full path is
/workspaces/training/eco-flow-training/ampliseq; on a local machine substitute your own path (usepwdto see it).
The experiment
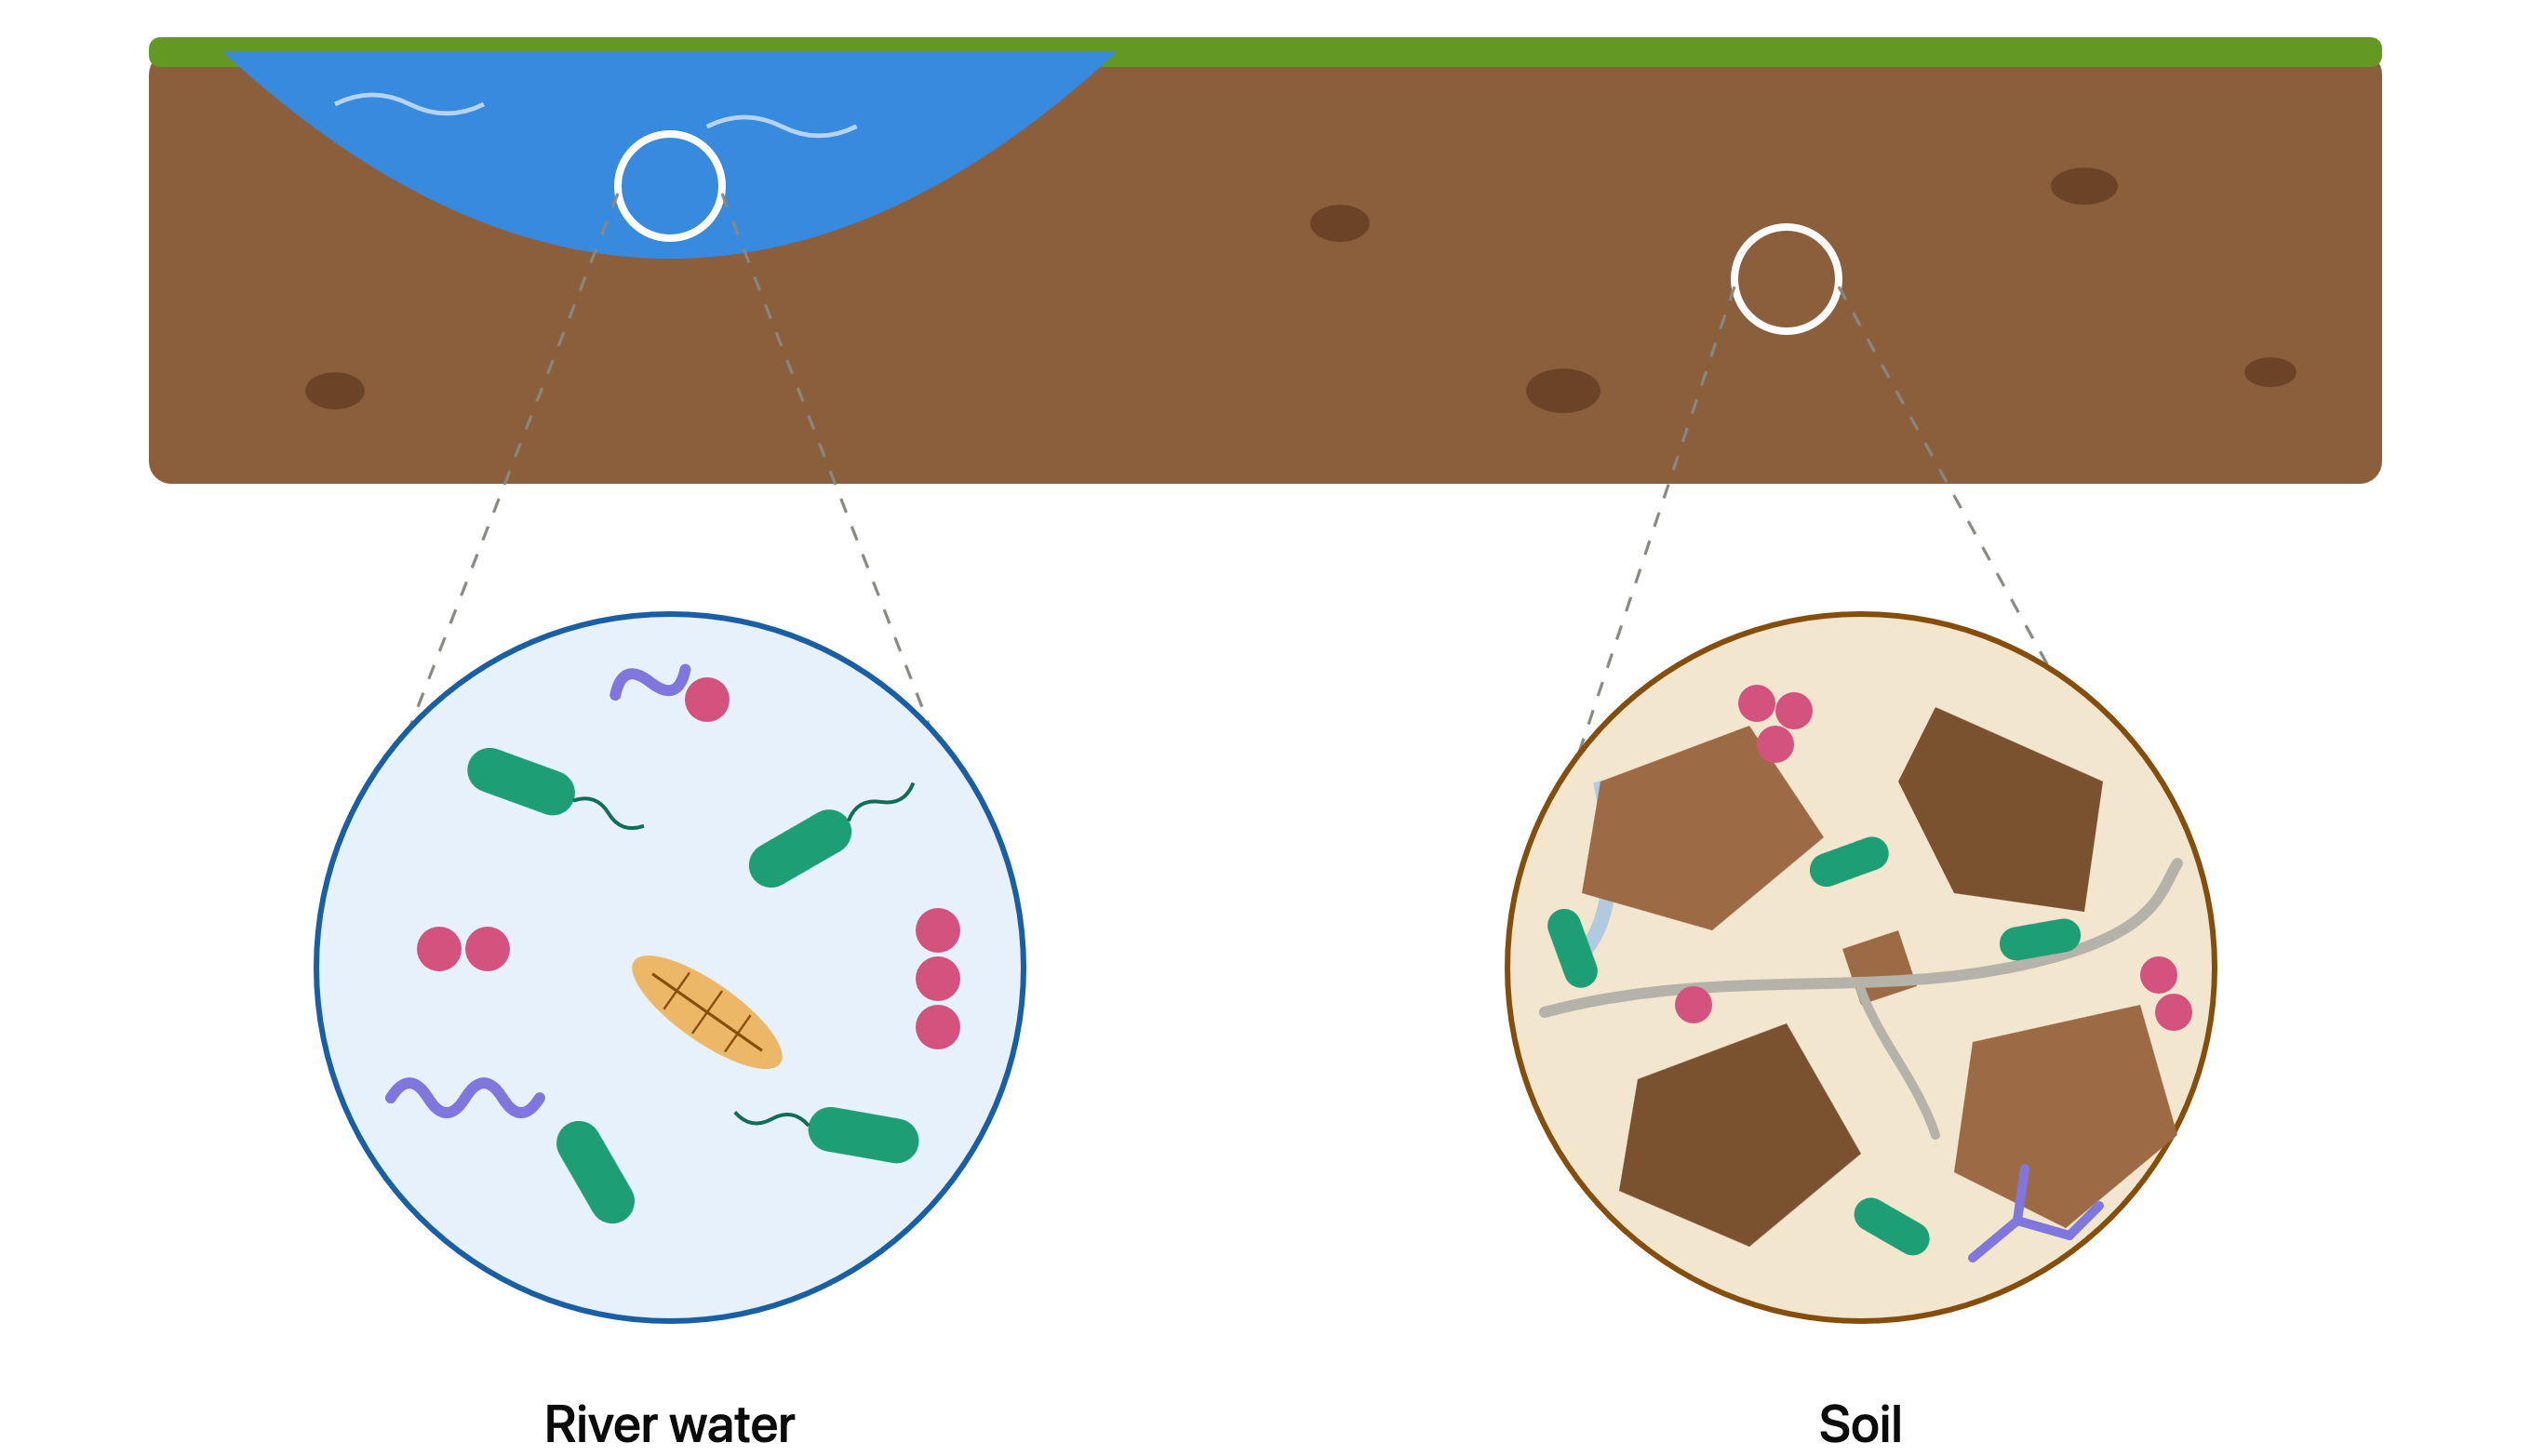
We’ll compare soil and river samples. DNA was extracted from both sites, with 2 replicates each, and amplicon sequencing was performed targeting the 16S rRNA V4 region for microbiome profiling and comparison between sites:
| Sample | Habitat | Reads |
|---|---|---|
| SRR10070130 | river | paired-end (_1 + _2) |
| SRR10070131 | river | paired-end (_1 + _2) |
| SRR10102392 | soil | paired-end (_1 + _2) |
| SRR10102393 | soil | paired-end (_1 + _2) |
Like mentioned, the primers for this course target the 16S rRNA V4 region, using the standard Earth Microbiome Project primer pair:
| Sequence | Target |
|---|---|
GTGYCAGCMGCCGCGGTAA |
16S rRNA V4, forward (515F) |
GGACTACNVGGGTWTCTAAT |
16S rRNA V4, reverse (806R) |
This is of course not a good experiment design -there’s no statistical power since we only have 2 replicates-, but its purpose is simply to give the test data some context.
Step 0 — Understand amplicon sequencing
Before running the amplicon sequencing pipeline, it helps to understand what amplicon sequencing is. In short: amplicon sequencing is a targeted sequencing method that uses PCR to amplify specific genomic regions of interest (e.g., CO1, 16S/18S, ITS) instead of the entire genome.
It results in libraries of sequences called reads, stored in FASTQ format. Depending on the sequencing technology used, reads can be single-end (one FASTQ per sample) or paired-end (two FASTQs per sample). We are going to explore and learn more about this format in the next section.
Step 1 — Inspect the raw data
It’s always worth looking at your data before running anything. The reads in FASTQ format live in the data folder.
The FASTQ files are compressed with gzip (they end in .gz), so they aren’t directly human-readable — plain cat/head would print gibberish (don’t panic if you see <��xT�r-�B7�..., that’s expected!). Instead, use zcat (from Part 1), which reads gzipped files.
🍎 On a Mac? In Codespaces (Linux)
zcatreads.gzfiles directly. macOS’szcatis different — it expects a.Zfile and will error on.gz. If you’re following along locally on a Mac, usegzcat(orgunzip -c) everywhere this page sayszcat.
▶️ Challenge — inspect a FASTQ file
Let’s have a quick overview of the FASTQ files using
ls:ls -lha data/ # Size of files should be roughly similar if they all came from the same runNow let’s check the number of lines and the size of the first sequence:
zcat data/SRR10070130_1.fastq.gz | wc -l
zcat data/SRR10070130_1.fastq.gz | head -n 2 | tail -n 1 | tr -d '\n' | wc -c
Let’s make sure the reverse FASTQ has the same number of lines
zcat data/SRR10070130_2.fastq.gz | wc -l✅ Answer
``` 12000 250 12000 ``` The first command shows there are `12000` lines in the file. A FASTQ record uses **4 lines per read**, so that corresponds to `3000` reads. The second command uses `head` and `tail` to grab the second line of the file, which is the first read sequence, and `wc -c` counts the number of characters in it. We add `tr -d '\n'` to strip the trailing newline first — without it, `wc -c` would also count the line break and report `251`. So the reads are `250` bases long. The third command confirms the reverse FASTQ also has `12000` lines — the same as the forward file, as expected for paired reads that are still properly mated. There are many ways to do this, and even copying the file into an editor and looking at it manually is fine.
Structure of a typical FASTQ file
Each read in a FASTQ file is stored as four lines:
- Header line — starts with
@and contains the read identifier. - Sequence line — the DNA bases for that read.
- Separator line — a single
+, often followed by the same read identifier. - Quality line — one character of quality score per base, usually in ASCII.
For example:
@SRR10070130.11 11/1
GTGTCAGCAGCCGCGGTAATACGTAGGGTACA...
+
BBCCCFFFFFFCGGGGGGGGGGHHHGGGHHHG...
This layout is important because it lets the pipeline keep the sequence and its quality information together for every read.
Step 2 — Explore the pipeline’s requirements
Go to the nf-core/ampliseq page and read what the pipeline does and what inputs it expects: 👉 https://nf-co.re/ampliseq/2.18.0
Cheat sheet — what the pipeline needs
To run nf-core/ampliseq you need: * an **input samplesheet** (CSV) that links to your raw amplicon sequencing FASTQ data - MANDATORY * an **input metadata** (CSV) with information about your samples - OPTIONAL * **Forward** and **Reverse** primers used during PCR amplification - OPTIONAL Samples are linked between the two files via the samplesheet's `sample` column and the metadata's `ID` column - their values must match.Step 3 — Build the samplesheet
The samplesheet is a CSV file that tells the pipeline which files belong to which sample.
Create a file called samplesheet.csv in the eco-flow-training/ampliseq folder:
touch samplesheet.csv
It has four columns:
| Column | Meaning |
|---|---|
sample |
A name you choose for the sample (must match across replicates you want grouped) |
fastq_1 |
Full path to the forward reads (R1) |
fastq_2 |
Full path to the reverse reads (R2) — leave empty for single-end samples |
⚠️ Paired vs single-end: all samples here are paired-end, but the samplesheet can also accept single-end samples. If the sample is single-end, fill
fastq_1, leavefastq_2blank — note the trailing comma.
Try to build the samplesheet yourself using the example on the nf-core page and the table from the The experiment section as a guide to build the 2 river water and 2 soil samples, then compare with the cheat sheet.
Cheat sheet — full samplesheet.csv
```csv sample,fastq_1,fastq_2 SRR10070130,/workspaces/training/eco-flow-training/ampliseq/data/SRR10070130_1.fastq.gz,/workspaces/training/eco-flow-training/ampliseq/data/SRR10070130_2.fastq.gz SRR10070131,/workspaces/training/eco-flow-training/ampliseq/data/SRR10070131_1.fastq.gz,/workspaces/training/eco-flow-training/ampliseq/data/SRR10070131_2.fastq.gz SRR10102392,/workspaces/training/eco-flow-training/ampliseq/data/SRR10102392_1.fastq.gz,/workspaces/training/eco-flow-training/ampliseq/data/SRR10102392_2.fastq.gz SRR10102393,/workspaces/training/eco-flow-training/ampliseq/data/SRR10102393_1.fastq.gz,/workspaces/training/eco-flow-training/ampliseq/data/SRR10102393_2.fastq.gz ``` The `sample` values are the raw SRR accessions, but they can be any other string, as long as they are unique per row and match the metadata file's `ID` column (Step 2).💡 Using absolute paths is highly recommended. The paths above are the Codespaces location. On a local machine, replace
/workspaces/training/eco-flow-training/ampliseqwith the output of your ownpwd.
Step 4 — Build the sample metadata
The sample metadata is a TSV (tab separated) file that gives information about the samples for downstream analysis (barplots, diversity indices, and differential abundance testing). It must follow QIIME2’s metadata specifications. It’s optional, but if it’s not provided, the pipeline will skip the downstream analyses.
Create a file called metadata.tsv in the eco-flow-training/ampliseq folder:
touch metadata.tsv
It has four columns:
| Column | Meaning |
|---|---|
ID |
A name you choose for the sample (must match the sample column from the samplesheet.csv) |
any_other_columns |
Any name, any number. Used as grouping variables for downstream stats (barplots, diversity, differential abundance). For the current course, we are going to focus on a single column |
Try to build the sample metadata yourself using the example on the nf-core page and the table from The experiment section as a guide to build the 2 river water and 2 soil samples, then compare with the cheat sheet. You can name the grouping column habitat, as we did in the table above.
Cheat sheet — full metadata.tsv
```tsv ID habitat SRR10070130 river SRR10070131 river SRR10102392 soil SRR10102393 soil ``` The `ID` values are the raw SRR accessions — they must match the `sample` column from `samplesheet.csv` exactly. `habitat` is the grouping column we chose, with repeated (but not all-unique) values so QIIME2 can use it for downstream comparisons.Step 5 — Run the pipeline
Let’s run nf-core/ampliseq using these pipeline-specific flags:
- samplesheet (
--input) - sample metadata (
--metadata) - forward primers (
--FW_primer) - reverse primers (
--RV_primer) - output directory name (
--outdir, choose anything).
(the primer sequences are in the The experiment section above)
Read the official run instructions here: https://nf-co.re/ampliseq/2.18.0/docs/usage
Two extra flags you must include in this environment:
-profile docker— runs every step inside its Docker container, so you don’t have to install any of the underlying tools. (On an HPC you’d use-profile singularityorapptainerinstead — ask your HPC team.)-c codespaces.config— a small custom config that adapts the pipeline to the tiny Codespaces machine. Without it the run is likely to fail. See below for exactly what it does.
We also pin the pipeline version with -r 2.18.0 so you get exactly the version this course was written for. But you can choose any other version.
💡 Why pin the version? Without
-r, Nextflow runs the latest revision of the pipeline. Pipeline parameters change between releases (options get renamed or removed), so an un-pinned command can silently break over time. Pinning to2.18.0guarantees this exact command keeps working — pinning is the safe choice, not a risky one.
What is the codespaces.config and why do we need it?
nf-core pipelines ship with sensible default resource requests — but those defaults assume a beefy server. A GitHub Codespace is a small machine (about 2 CPUs and 8 GB RAM), so several steps would ask for more memory or CPUs than exist and the run would crash. The config file solves this. Open it (cat codespaces.config) and you’ll see:
process {
    resourceLimits {
        memory = '6.GB'   // never request more than 6 GB for any step
        cpus   = 2        // never request more than 2 CPUs
        time   = '1.h'    // cap each step at 1 hour
    }
}
resourceLimitsis a Nextflow feature that caps each step’s request. If the pipeline asks a step for 12 GB, Nextflow quietly clamps it down to our 6 GB limit so it still fits on the machine.
📝 On your own laptop or an HPC you generally wouldn’t need this file — you’d let the pipeline use its defaults, or write a config tuned to your machine. It exists purely to make the pipeline fit inside Codespaces.
Cheat sheet — the full command
```bash nextflow run nf-core/ampliseq \ -r 2.18.0 \ -profile docker \ -c codespaces.config \ --input ./samplesheet.csv \ --metadata ./metadata.tsv \ --FW_primer GTGYCAGCMGCCGCGGTAA \ --RV_primer GGACTACNVGGGTWTCTAAT \ --outdir results ``` The `\` at the end of each line just lets one command span several lines for readability.👉 Single vs double dashes matter! A single dash (
-profile,-r,-c,-resume) is a Nextflow core option. A double dash (--input,--metadata,--outdir) is a pipeline parameter defined inside nf-core/ampliseq.
✅ What success looks like: Nextflow prints a banner and then a live list of processes as they run — something like:
Nextflow 26.04.6 is available - Please consider updating your version to it

 N E X T F L O W   ~  version 26.04.2

Launching `https://github.com/nf-core/ampliseq` [silly_lavoisier] revision: 2723d4c298 [2.18.0]


------------------------------------------------------
                                        ,--./,-.
        ___     __   __   __   ___     /,-._.--~'
  |\ | |__  __ /  ` /  \ |__) |__         }  {
  | \| |       \__, \__/ |  \ |___     \`-._,-`-,
                                        `._,._,'
  nf-core/ampliseq 2.18.0
------------------------------------------------------

Main arguments
  input              : samplesheet.csv
  FW_primer          : GTGYCAGCMGCCGCGGTAA
  RV_primer          : GGACTACNVGGGTWTCTAAT
  metadata           : metadata.tsv
  outdir             : results

Differential abundance analysis
  ancombc_effect_size: 1

Generic options
  trace_report_suffix: 2026-09-24_14-17-19

Core Nextflow options
  revision           : 2.18.0
  runName            : silly_lavoisier
  containerEngine    : docker
  launchDir          : /workspaces/training/eco-flow-training/ampliseq
  workDir            : /workspaces/training/eco-flow-training/ampliseq/work
  projectDir         : /home/vscode/.nextflow/assets/.repos/nf-core/ampliseq/clones/2723d4c298d48321594920d0324697e14d73ee94
  userName           : vscode
  profile            : docker
  configFiles        : /home/vscode/.nextflow/assets/.repos/nf-core/ampliseq/clones/2723d4c298d48321594920d0324697e14d73ee94/nextflow.config, /workspaces/training/eco-flow-training/ampliseq/codespaces.config

!! Only displaying parameters that differ from the pipeline defaults !!
------------------------------------------------------

* The pipeline
    https://doi.org/10.5281/zenodo.1493841
    https://doi.org/10.3389/fmicb.2020.550420

* The nf-core framework
    https://doi.org/10.1038/s41587-020-0439-x

* Software dependencies
    https://github.com/nf-core/ampliseq/blob/master/CITATIONS.md

WARN: No DADA2 read truncation cutoffs were specified (`--trunclenf` & `--trunclenr`), therefore reads will be truncated where median quality drops below 25 (defined by `--trunc_qmin`) but at least a fraction of 0.75 (defined by `--trunc_rmin`) of the reads will be retained.
The chosen cutoffs do not account for required overlap for merging, therefore DADA2 might have poor merging efficiency or even fail.
The cutoffs are chosen before any quality score-based read truncation (using `--truncq`) is performed.

executor >  local (2)
executor >  local (4)
executor >  local (4)
executor >  local (4)
executor >  local (4)
[a4/8e083f] NFCORE_AMPLISEQ:AMPLISEQ:RENAME_RAW_DATA_FILES (SRR10070130)       [ 50%] 2 of 4
executor >  local (4)
[40/1c5fc8] NFCORE_AMPLISEQ:AMPLISEQ:RENAME_RAW_DATA_FILES (SRR10102393)       [ 75%] 3 of 4
...
This run takes roughly 20-30 minutes on the small test data — leave it running. The first time, Nextflow also downloads the containers, which adds a few minutes.
Other options
We ran the pipeline with minimal input and with default parameters. The default parameters are hidden, but they are present in our run, and can be changed. To explore the rest of the input/parameters options the pipeline offers, go to https://nf-co.re/ampliseq/2.18.0/parameters/. Some examples include:
--dada_ref_taxonomy. DADA2 reference taxonomy database for taxonomic assignment. There’s a fixed number of supported databases.--ref_taxonomy_storage. Local storage for DADA2 reference taxonomic database for taxonomic assignment.--min_frequency. Filter out ASVs below this abundance threshold.--min_samples. Keep ASVs present in at least this number of samples.
Let’s run the pipeline again, changing these parameters:
Cheat sheet — the full command
```bash nextflow run nf-core/ampliseq \ -r 2.18.0 \ -profile docker \ -c codespaces.config \ --input ./samplesheet.csv \ --metadata ./metadata.tsv \ --FW_primer GTGYCAGCMGCCGCGGTAA \ --RV_primer GGACTACNVGGGTWTCTAAT \ --dada_ref_taxonomy rdp \ --min_frequency 2 \ --min_samples 2 \ --outdir results ``` The `\` at the end of each line just lets one command span several lines for readability.Troubleshooting
If the run stops with an error, it’s almost always one of these:
❌ Missing required parameter: --input / --outdir
You didn't supply one of the required parameters. Check every `--input`, `--metadata`, and `--outdir` is present and spelled correctly.
❌ Not a valid path value: 'metadata.tsv'
A path is wrong or not absolute. Provide the **full** path, e.g. `/workspaces/training/eco-flow-training/ampliseq/metadata.tsv`, and confirm the file exists with `ls -l`.
❌ .command.sh: line 7: fastqc: command not found (exit status 127)
You forgot **`-profile docker`**. Without it, Nextflow looks for the tools installed locally — but they aren't. Adding `-profile docker` makes each step run inside a container that already has the tool.
Step 6 — Explore the results
Once the pipeline finishes (Pipeline completed successfully), look inside your --outdir folder (results).
▶️ See what was produced
ls results✅ Roughly what you'll see
``` ... barrnap cutadapt dada2 fastqc input multiqc ... ``` Each folder holds the output of one stage of the pipeline.
The full catalogue of outputs is documented here: https://nf-co.re/ampliseq/2.18.0/docs/output/ — spend ~10 minutes skimming it while the run finishes.
Step 7 — Resuming a run
Real analyses are rarely run just once — you tweak options and re-run.
The -resume flag
Add -resume and Nextflow will reuse the cached results of any steps that haven’t changed, instead of recomputing them from scratch. It will use the work directory, which can be set using the -w flag. By default, the work directory will in the directory where you run the pipeline.
✅ What you’ll see with
-resume: unchanged processes are marked as cached, e.g.[27/7e1c6d] NFCORE_AMPLISEQ:AMPLISEQ:RENAME_RAW_DATA_FILES (SRR10102392) [100%] 4 of 4, cached: 4 ✔The word
cachedtells you Nextflow skipped the real work and reused the previous result — a huge time-saver during development.
Finish
🎉 You’ve finished the course! You’ve run a complete, reproducible amplicon sequencing pipeline — from raw reads to ASV/taxonomy tables and diversity reports — using industry-standard nf-core tooling.
Next steps:
- Continue to Part 6 · Nanopore metabarcoding ▶️.
- Running on a cluster? See the bonus Running a pipeline on an HPC.
- Learn to write your own Nextflow: the excellent Seqera training.
- Eco-Flow will be providing more foundational Nextflow courses soon — email us to join the mailing list: ecoflow . ucl @ gmail . com